Posty

New version of XMachina: [1191023]

Obraz
New version of XMachina: [ 1191023 ] Important bug fix for impedance characteristic calculation. Automatic Curve Reader feature in the "Load characteristic from picture" window. Short description below. Make a screenshot of the characteristic. Right click on the FRD (or ZMA) node and choose „Load from picture” from the menu. Paste your picture with the characteristic to digitize. It can be strongly zoomed, no need to worry that it won’t fit into the window (as it has scrollbars). Click on the chart and enter frequency and dBspl for the clicked point: Do the same for another point on the chart. This is done to establish translation from pixels X-Y coordinates into frequency-dBspl domain. Right click on the picture an choose “Automatic Curve Reader” from the menu. Click on the curve you want to digitize to get it’s color and see the result. If the picture is noisy or there are more curves/objects of the selected color on the picture the processin...
Parallel processing with new version of XMachiana

Obraz
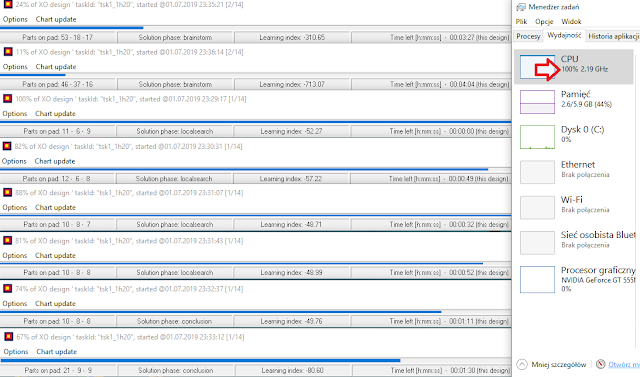
New version of XMachina can benefit from multi-core architecture of a PC system. Usually, when working with XMachina, it is configured to deliver several solutions. They can be designed in the same time by different instances of XMachina working simultaneously on different cores.  It was possible also with the previous versions but it was required that each instance of XMachina had it's own copy of the design file. Keeping control over design when the data is spread on (for example) 8 files was problematic.  The problem is eliminated in the new version. Introduction of storage mediator allows that many instances of XMachina can write to the same design file. To benefit from parallel processing with XMachina_v [1190701], follow these easy steps:  - crate a design task and save the design file,  - start the design,  - start a new instance of XMachina, open the same design file and start the design,  - repeat the last point several time...
Obraz
Latest version of XMachina: [1190515]  download New features: Common ground architecture option in the design task setup window.  Check it to get circuits designed with common ground, something like:  Design time manager.  For example, to get 4 designs until the same time next day set it this way: so XMachina will spent 6 hours on each design. Needless to say the longer design time the better results to be expected, however before starting long designs it’s recommended to execute few test 5 to 10 min designs just to make sure that there are no issues in the design task settings. It’s also easy to setup a test run with the time manager feature, for instance: XMachina can design in the background. No special settings are needed, for example while XMachina is working on design nr 3 of 4 you can analyze or edit finished designs nr 1 and 2. The design process nr 3 is being continued in the background (then nr 4).

New version of XMachina [1190115]

Obraz
New version  of XMachina : [ 1190115 ] 1) Impedance phase equalization option introduced. See "System impedance target" group in the task settings window. 2) Protection against impedance module fall for high frequencies added. Basically the impedance targets are checked a decade beyond the end frequency for dBspl target (that is to 200kHz typically). 3) To avoid application of large inductors/capacitors/high power resistors it is recommended that dBspl target curve follows the woofer characteristic  in the low frequency region. You can use "follow the woofer" tool to set it this way, it's available in the context menu of the chart area: then click points  to define the rest of the target, for example:
Few improvements and corrections in the new version [ 1180415 ]. Measurements simulator: front baffle characteristic is applied also on the LF response.  “Recent" submenu was added in the "File" menu for easy re-opening previous works and experiments. Circuit price calculation: when moving mouse over a design node, the price appears in the status bar. This works only if all of the elements included in the circuit have price defined (check your components lists), otherwise it is displayed as "n/a". Remember to use the same currency for all elements when creating lists of components for a design.  Price calculation feature made me think of an idea to include circuit price reduction as an additional (optional) goal for the automatic designer. Maybe it will appear in one of the next versions
Obraz
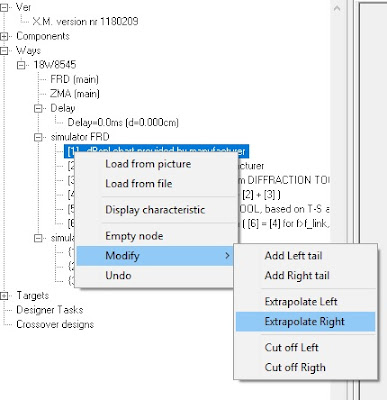
New version of XMachina: [ 1180209 ]. An option to digitize impedance characteristics in logarithmic scale has been added to the axis definition window. (For example Scan-Speak data datasheets use logarithmic impedance charts). Few simple tools have been implemented in the measurement simulator, supporting to estimate characteristics outside the loaded range. The characteristics can be “tailed” with a specified slope or extrapolated with a slope calculated from the characteristic shape at the edge. In case of impedance characteristics, values of DC resistance (Re) and voice coil inductance (Le) can be utilized for the estimation (Re for low and Le for high frequency range). Estimation improves the accuracy of phase calculation. It was used also in the previous version but only as an “on the fly” action during the acceptance of measurements simulator results.
Obraz
XMachina has now a measurements simulator. Check out the new version [ 1180114 ] Take measurements whenever you can. But if for any reason you can not - try measurements simulator. The quality of the simulator results depends on several factors:  - precision and reliability of manufacturer data,  - accuracy of computer models predicting baffle diffraction and enclosure bass response  - consistency of XMachina measurements simulator procedure (which has not yet been proven in practice). It's possible to use any diffraction and bass response tools with XMachina. It can cooperate with the tools via easy to use "chart picture" interface. You can configure shortcut keys for starting these tools when working with XMachina. Using the simulator: complete dedicated subnodes with relevant data one by one. When you get to the last node, choose "Apply result" from the menu. From that moment your simulation will be available for automatic crossover design. . ...